OpenPLC Editor for CONTROLLINO
Introduction In the world of industrial automation, having an intuitive and powerful programming environment is key. OpenPLC Editor, combined with CONTROLLINO, brings a seamless IEC
This example shows you how to connect 1-wire temperature sensor to the Controllino device and read the temperature or address of the sensor on the bus.
DS18B20 is 1-Wire digital temperature sensor from Maxim IC. Reports degrees in Celsius or Fahrenheit with 9 to 12-bit precision, from –55°C to +125°C (–67°F to +257°F)±0.5°C. Each sensor has a unique 64-Bit Serial number etched into it – allows for a huge number of sensors to be used on one data bus.
IMPORTANT INFORMATION!
Please, select proper target board in Tools->Board->Controllino MINI/MAXI/MEGA before Upload to your CONTROLLINO.
(Please, refer to https://github.com/CONTROLLINO-PLC/CONTROLLINO_Library if you do not see the CONTROLLINOs in the Arduino IDE menu Tools->Board.)
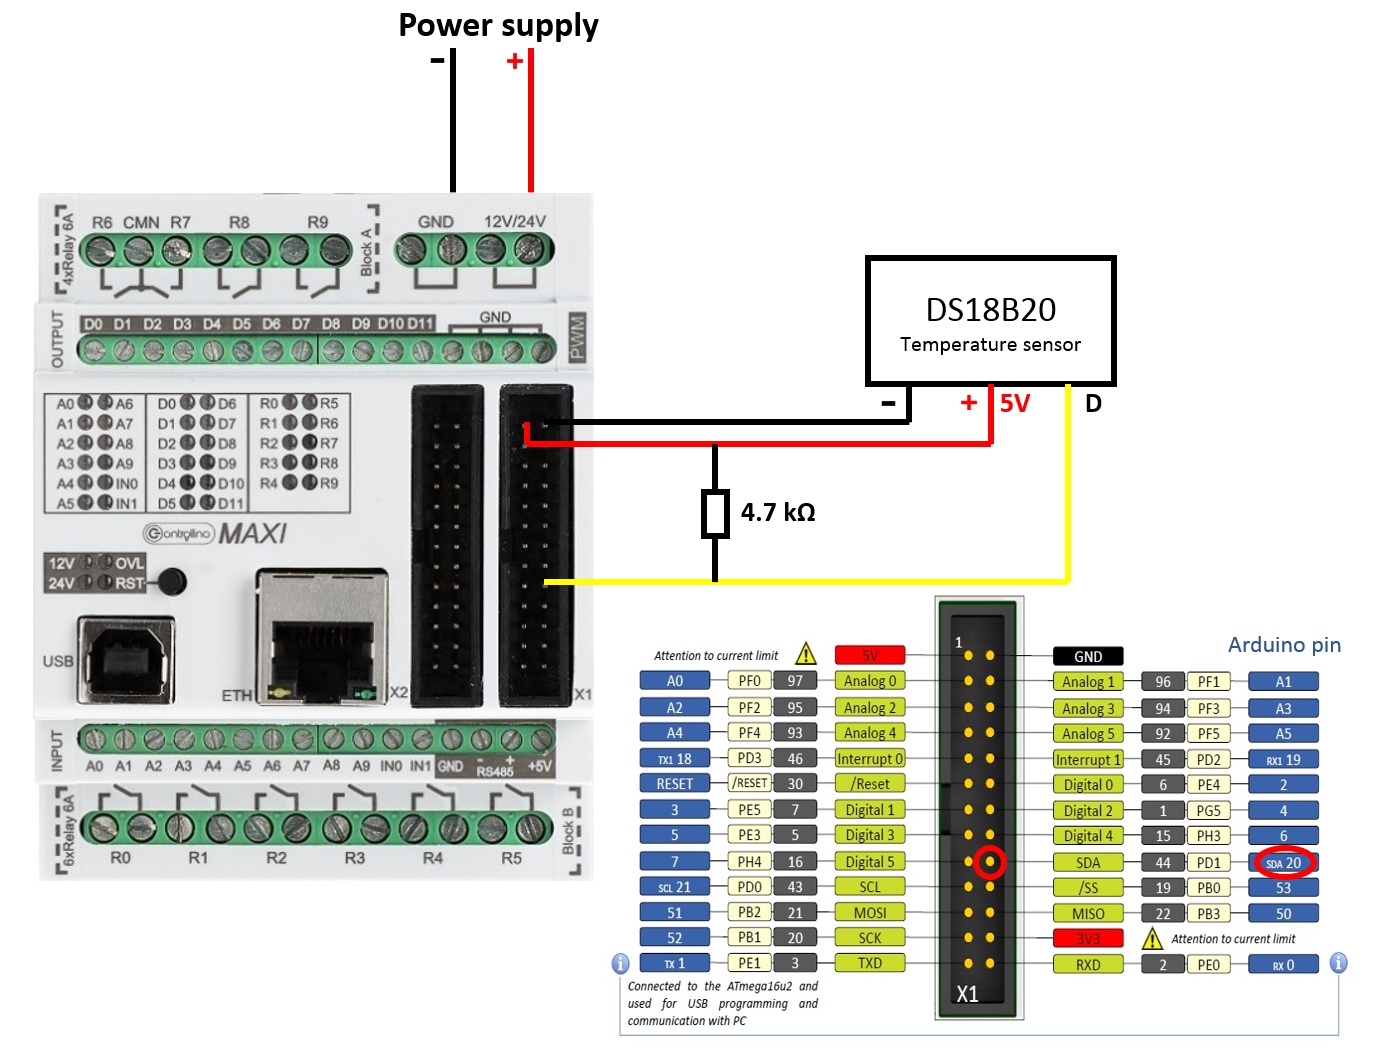
When connecting your sensor you can choose the pin that you want to connect it to.
In this case the data pin of the sensor is connected to the SDA communication pin, but it can also be connected on any digital, relay output (5V pin), or communication pin. The best way is to choose the pin that is free and not used.
Note*
Pin header is working on 5V TTL levels. Voltage levels over 5.5V can damage the Controllino permanently.
To get the readings from the temperature sensor you need to instal OneWire library.
Open Sketch->Include Library->Manage Libraries…
In this example we use OneWire 2.3.3 library.
After installing the library you have to open File->Examples->OneWire->DS18x20_Temperature and run the example. The only thing you have to change in the code is the data pin that you are using in line: OneWire ds(20);
#include <OneWire.h>

// OneWire DS18S20, DS18B20, DS1822 Temperature Example
//
// https://www.pjrc.com/teensy/td_libs_OneWire.html
//
// The DallasTemperature library can do all this work for you!
// https://milesburton.com/Dallas_Temperature_Control_Library

OneWire ds(20); // on pin 20 (a 4.7K resistor is necessary)

void setup(void) {
 Serial.begin(9600);
}

void loop(void) {
 byte i;
 byte present = 0;
 byte type_s;
 byte data[12];
 byte addr[8];
 float celsius, fahrenheit;

 if ( !ds.search(addr)) {
 Serial.println("No more addresses.");
 Serial.println();
 ds.reset_search();
 delay(250);
 return;
 }

 Serial.print("ROM =");
 for( i = 0; i < 8; i++) {
 Serial.write(' ');
 Serial.print(addr[i], HEX);
 }

 if (OneWire::crc8(addr, 7) != addr[7]) {
 Serial.println("CRC is not valid!");
 return;
 }
 Serial.println();

 // the first ROM byte indicates which chip
 switch (addr[0]) {
 case 0x10:
 Serial.println(" Chip = DS18S20"); // or old DS1820
 type_s = 1;
 break;
 case 0x28:
 Serial.println(" Chip = DS18B20");
 type_s = 0;
 break;
 case 0x22:
 Serial.println(" Chip = DS1822");
 type_s = 0;
 break;
 default:
 Serial.println("Device is not a DS18x20 family device.");
 return;
 }

 ds.reset();
 ds.select(addr);
 ds.write(0x44, 1); // start conversion, with parasite power on at the end

 delay(1000); // maybe 750ms is enough, maybe not
 // we might do a ds.depower() here, but the reset will take care of it.

 present = ds.reset();
 ds.select(addr);
 ds.write(0xBE); // Read Scratchpad

 Serial.print(" Data = ");
 Serial.print(present, HEX);
 Serial.print(" ");
 for ( i = 0; i < 9; i++) { // we need 9 bytes
 data[i] = ds.read();
 Serial.print(data[i], HEX);
 Serial.print(" ");
 }
 Serial.print(" CRC=");
 Serial.print(OneWire::crc8(data, 8), HEX);
 Serial.println();

 // Convert the data to actual temperature
 // because the result is a 16 bit signed integer, it should
 // be stored to an "int16_t" type, which is always 16 bits
 // even when compiled on a 32 bit processor.
 int16_t raw = (data[1] << 8) | data[0];
 if (type_s) {
 raw = raw << 3; // 9 bit resolution default
 if (data[7] == 0x10) {
 // "count remain" gives full 12 bit resolution
 raw = (raw & 0xFFF0) + 12 - data[6];
 }
 } else {
 byte cfg = (data[4] & 0x60);
 // at lower res, the low bits are undefined, so let's zero them
 if (cfg == 0x00) raw = raw & ~7; // 9 bit resolution, 93.75 ms
 else if (cfg == 0x20) raw = raw & ~3; // 10 bit res, 187.5 ms
 else if (cfg == 0x40) raw = raw & ~1; // 11 bit res, 375 ms
 //// default is 12 bit resolution, 750 ms conversion time
 }
 celsius = (float)raw / 16.0;
 fahrenheit = celsius * 1.8 + 32.0;
 Serial.print(" Temperature = ");
 Serial.print(celsius);
 Serial.print(" Celsius, ");
 Serial.print(fahrenheit);
 Serial.println(" Fahrenheit");
}