OpenPLC Editor for CONTROLLINO
Introduction In the world of industrial automation, having an intuitive and powerful programming environment is key. OpenPLC Editor, combined with CONTROLLINO, brings a seamless IEC
The LiquidCrystal library allows you to control LCD displays that are compatible with the Hitachi HD44780 driver. These are the LCDs that are usually connected over a 16-pin interface.
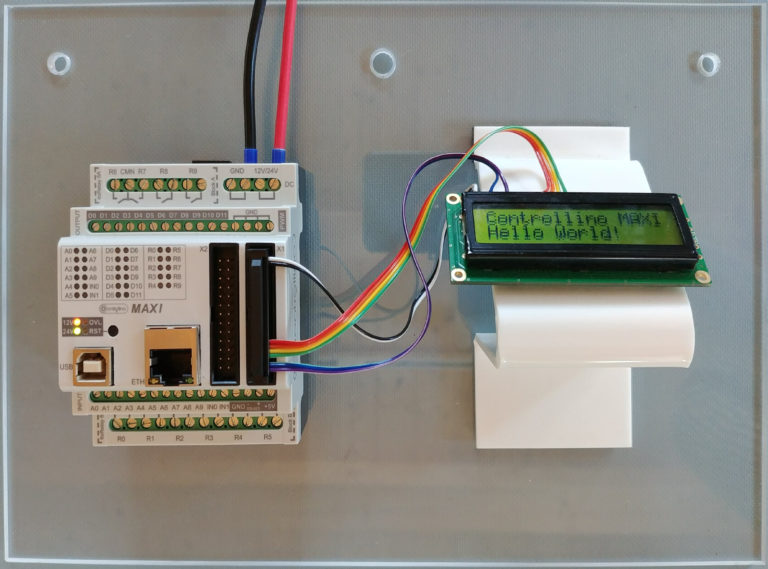
This example sketch prints “Hello World!” to the LCD and shows the time in seconds since the Arduino was reset. To see more about 16×2 LCD and related pins please visit https://www.arduino.cc/en/Tutorial/HelloWorld?from=Tutorial.LiquidCrystal
Instead of the pins that we use in this example you can use every other communication, output and input pin. We suggest to use first communication and output pins because of internal resistors and then input pins.
In this example we don’t need UART and SPI communication and we are using these pins to have all input and output pins free.
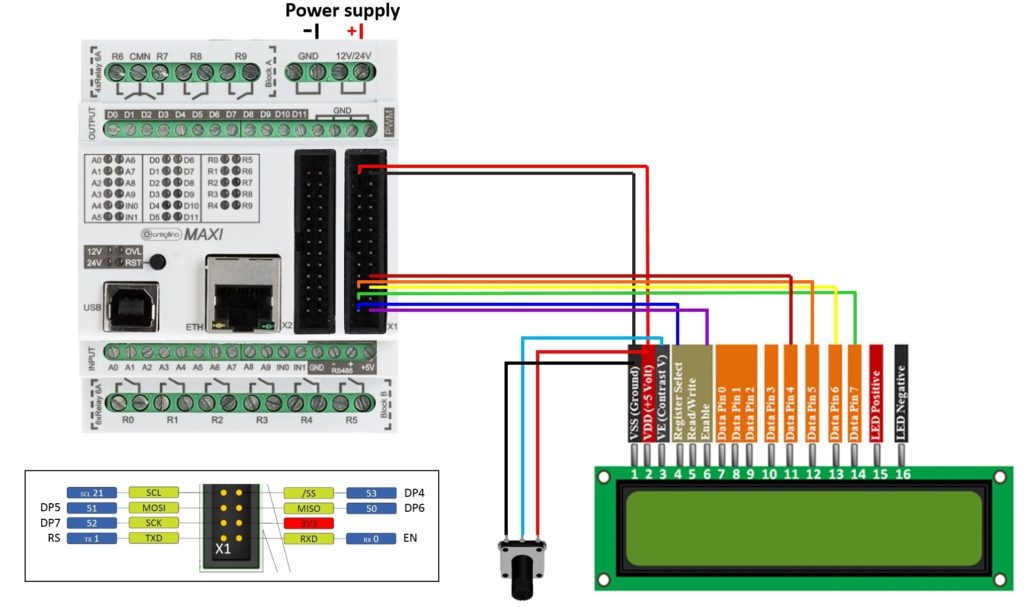
Note:
Pin header is working on 5V TTL levels. Voltage levels over 5.5V can damage the Controllino permanently!
/*
 LiquidCrystal Library - Hello World

 Demonstrates the use a 16x2 LCD display. The LiquidCrystal
 library works with all LCD displays that are compatible with the
 Hitachi HD44780 driver. There are many of them out there, and you
 can usually tell them by the 16-pin interface.

 This sketch prints "Hello World!" to the LCD

 This example code is in the public domain.

 https://www.arduino.cc/en/Tutorial/LiquidCrystal
 */

// include the library code:
#include <LiquidCrystal.h>
//#include <Controllino.h>

// initialize the library with the numbers of the interface pins
LiquidCrystal lcd(1, 0, 53, 51, 50, 52);

void setup() {

 // set up the LCD's number of columns and rows:
 lcd.begin(16, 2);

 // Print a message to the LCD.
 lcd.print("Controllino MAXI");

}

void loop() {

 // set the cursor to column 0, line 1
 // (note: line 1 is the second row, since counting begins with 0):

 lcd.setCursor(0, 1);

 // print the number of seconds since reset:
 lcd.print("Hello World!");

 delay(5);

}