OpenPLC Editor for CONTROLLINO
Introduction In the world of industrial automation, having an intuitive and powerful programming environment is key. OpenPLC Editor, combined with CONTROLLINO, brings a seamless IEC
Every CONTROLLINO has a built-in RTC of the type RV-2123-C2-TA-QC-020 with buffered power supply. The RTC also runs without external power supply for about 2 weeks. So after a loss of supply voltage you don’t have to reconfigure the time. In the user program you can set the hour, minute, second, day, weekday, month and year. These values can be prompted and can be used directly or in logical combination with other conditions as a trigger for specific operations.
IMPORTANT INFORMATION!
Please, select proper target board in Tools->Board->Controllino MINI/MAXI/MEGA before Upload to your CONTROLLINO.
(Please, refer to https://github.com/CONTROLLINO-PLC/CONTROLLINO_Library if you do not see the CONTROLLINOs in the Arduino IDE menu Tools->Board.)
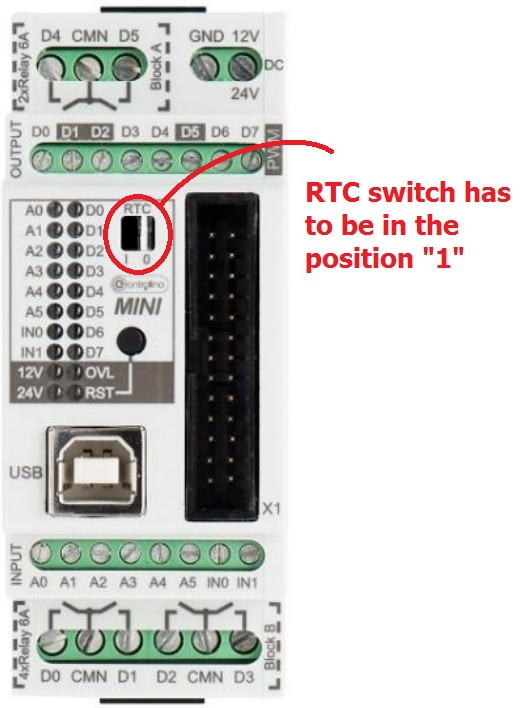
On CONTROLLINO MINI the “RTC” switch is made for switching the internal RTC (Real Time Clock) onto the SPI bus. If you use the RTC in your program, the switch has to be in the “1” position, otherwise there would be no data connection to the RTC.
Note*
Pin header is working on 5V TTL levels. Voltage levels over 5.5V can damage the Controllino permanently.
To set initial values to the RTC chip we use function from Controllino Library:
Controllino_SetTimeDate(31,2,1,17,8,37,23); // (Day of the month, Day of the week, Month, Year, Hour, Minute, Second)#include <SPI.h>
#include <Controllino.h> /* Usage of CONTROLLINO library allows you to use CONTROLLINO_xx aliases in your sketch. */
// The setup function runs once when you press reset (CONTROLLINO RST button) or connect power supply
// (USB or external 12V/24V) to the CONTROLLINO.
void setup() {
// initialize serial communication at 9600 bits per second
Serial.begin(9600);
Controllino_RTC_init(0);
Controllino_SetTimeDate(31,2,1,17,8,37,23); // set initial values to the RTC chip
}
// the loop function runs over and over again forever
void loop() {
int n;
Serial.print("Day: ");n = Controllino_GetDay(); Serial.println(n);
Serial.print("WeekDay: ");n = Controllino_GetWeekDay(); Serial.println(n);
Serial.print("Month: ");n = Controllino_GetMonth(); Serial.println(n);
Serial.print("Year: ");n = Controllino_GetYear(); Serial.println(n);
Serial.print("Hour: ");n = Controllino_GetHour(); Serial.println(n);
Serial.print("Minute: "); n = Controllino_GetMinute(); Serial.println(n);
Serial.print("Second: ");n = Controllino_GetSecond(); Serial.println(n);
delay(5000);
}